Step 1
Create a new document with 1000 height and 1300 wide px and set background to white. It's my setting but sure you can start with your own value.
![rain1[4] rain1[4]](http://photoshoptutorials.ws/images/stories/dd77ff9a833f_95C/rain14.jpg)
Open lake 1 stock. Use Retangular Marquee tool to make a selection for it as we don't need whole picture. Press Cmd/Ctrl+J to copy this part into a new layer. Use Move Tool to drag this part into our canvas, place it at the bottom:
Name this layer as "lake".
Step 2
Now we will remove the ladder sunk under water. On lake layer, use any tools you like to make selection for the part beside the lader and set feather =1 for it, copy this part into a new layer. Move it to the right to hide the ladder then add layer mask with soft black brush to soften the rough edges:
Step 3
Open sky stock. Use method as we did in first step to copy the sky part and position it at the top of picture:
Use layer mask to hide rough edges of it:
Call it as "sky".
Step 4
To change color and brightness of sky to be fit the background, I add some adjustment layers with Clipping Mask option for sky:
Hue/Saturation:
Color Balance:
Hue/Saturation:
This is result we have:
Step 5
In this step we will retouch the sky to get more dramatic effect. There are some parts which need to be darker or brighter. First make a new layer ( hit Cmd/Ctrl+Shift+N to do it), take soft brush with color #b6bcd0 ( similar color to sky) painting in sky as shown below. Change the mode to Multipy 30%:
Create a new layer and we use soft brush with same color, painting on bright parts of sky. Put this layer as Soft light 100%:
Step 6
To make the part of lake which meets sky get more misty effect, I use a new layer and brush with color #c3c7da to paint on this part and set mode as Normal 80%:
Step 7
Create a new layer on the top and set foreground color to white. I use some random lightning brushes painting from bright parts of sky then use erase with opacity about 50% to blur lightning bottom to make it intergrate better with sky:
Step 8
Open lake 2 stock. Cut only mountain and place it at the horizonon our main document, lower opacity of it to 20%. Add layer mask and use soft black brush to clear uneccessary parts:
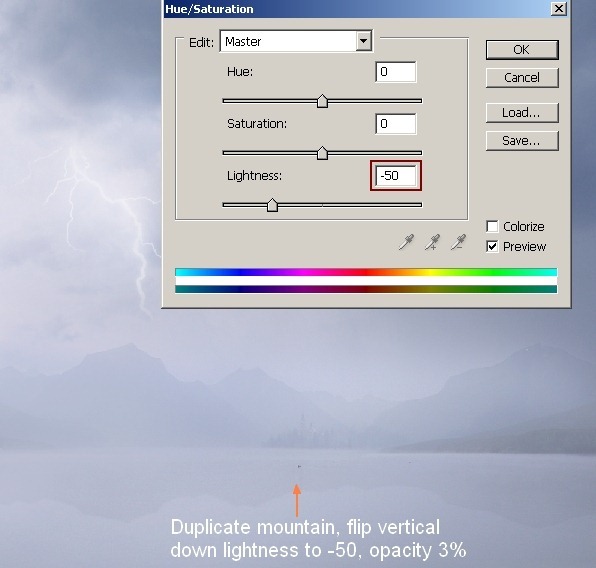
Duplicate this mountain and apply Flip Vertical for under layer ( Edit-Transform-Flip Vertical), set position to make mountain reflection, lower opacity to 3%. You should use transform tool ( Cmd/Ctrl+T) to stretch in vertical to make it narrower . Then press Cmd/Ctrl+U to open Hue/Saturation dialog, drag Lightness button to -50:
Step 9
Open model stock. I'll show you how to extract the shawl and a part of dress to get it transparent. First use any tools you're familiar with to make selection around model. Copy this into a new layer, name it "model". I add a new layer under this layer and fill it with black then I can see if I make any errors of cutting.
When you're sastified with the result, it's time to extract the shawl.
Add a background under extracted model, I use lake 1 image to help you see the result clearly. Choose model layer, hit Cmd/Ctrl+Alt+2 to load bright parts of picture. Hit Cmd/Ctrl+J to copy this part into a new layer, change opacity to 50%. Come back to model layer, load bright parts by Cmd/Ctrl+Alt+2 again. Take Erase Tool ( hit E to active it) with opacity about 70% and paint within the part which we need to remove white background. Remember that you should do it gently and avoid the contour of shawl and dress. Erase until you get desired look.
Merge two these layers.
Step 10
This step is done because a part of umbrella is missed. Move model after being merged into our document, resize and place her on the lake.
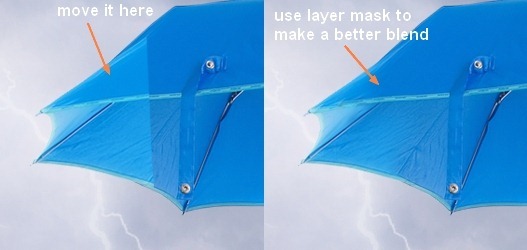
I use a closer-up shot of this model. Copy the part shown in screenshot below and drag it into our canvas, resize to make it smaller. Add layer mask to make this part blend well with the rest of umbrella:
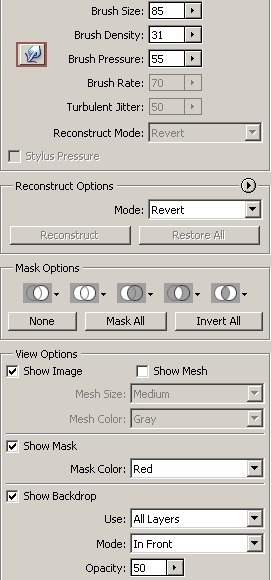
To make model get a more delicate look, I use Liquify Tool. On model layer, choose Filter-Liquify-Forward Warp Tool:
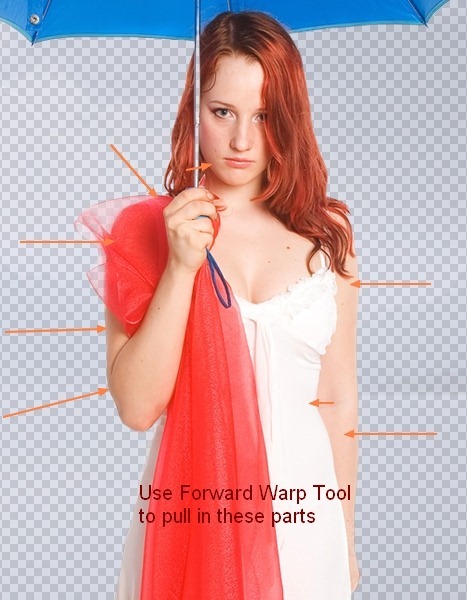
Pull in the shoulder, arm, face, waist of model to make them slimmer:
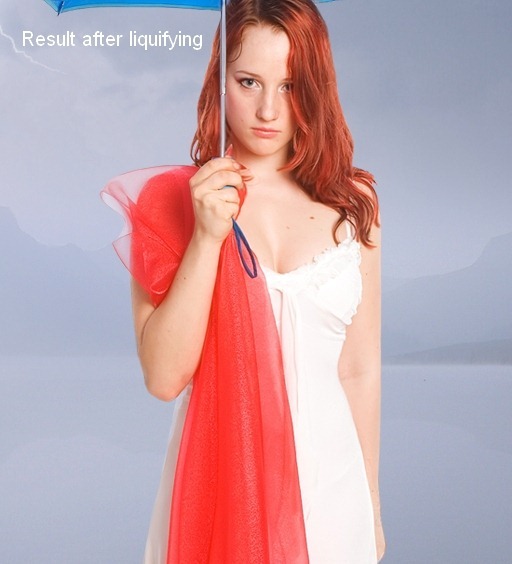
This is result I get:
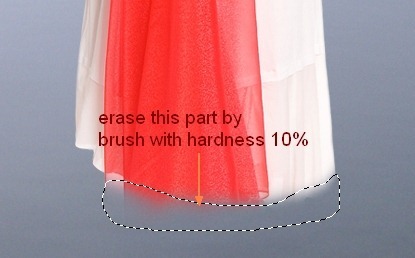
Add layer mask for model layer , use black brush with hardness about 10% to blur dress bottom. Try to make the masked part round to get rid of flat effect:


![rain1a[4] rain1a[4]](http://photoshoptutorials.ws/images/stories/dd77ff9a833f_95C/rain1a4.jpg)
![rain1b[4] rain1b[4]](http://photoshoptutorials.ws/images/stories/dd77ff9a833f_95C/rain1b4.jpg)
![rain1c[4] rain1c[4]](http://photoshoptutorials.ws/images/stories/dd77ff9a833f_95C/rain1c4.jpg)
![rain2[4] rain2[4]](http://photoshoptutorials.ws/images/stories/dd77ff9a833f_95C/rain24.jpg)
![rain3[4] rain3[4]](http://photoshoptutorials.ws/images/stories/dd77ff9a833f_95C/rain34.jpg)
![rain3a[4] rain3a[4]](http://photoshoptutorials.ws/images/stories/dd77ff9a833f_95C/rain3a4.jpg)
![rain4[4] rain4[4]](http://photoshoptutorials.ws/images/stories/dd77ff9a833f_95C/rain44.jpg)
![rain4a[4] rain4a[4]](http://photoshoptutorials.ws/images/stories/dd77ff9a833f_95C/rain4a4.jpg)
![rain4b[4] rain4b[4]](http://photoshoptutorials.ws/images/stories/dd77ff9a833f_95C/rain4b4.jpg)
![rain4c[4] rain4c[4]](http://photoshoptutorials.ws/images/stories/dd77ff9a833f_95C/rain4c4.jpg)
![rain5[4] rain5[4]](http://photoshoptutorials.ws/images/stories/dd77ff9a833f_95C/rain54.jpg)
![rain5a[4] rain5a[4]](http://photoshoptutorials.ws/images/stories/dd77ff9a833f_95C/rain5a4.jpg)
![rain6[4] rain6[4]](http://photoshoptutorials.ws/images/stories/dd77ff9a833f_95C/rain64.jpg)
![rain7[4] rain7[4]](http://photoshoptutorials.ws/images/stories/dd77ff9a833f_95C/rain74.jpg)
![rain8[4] rain8[4]](http://photoshoptutorials.ws/images/stories/dd77ff9a833f_95C/rain84.jpg)
![rain8a[4] rain8a[4]](http://photoshoptutorials.ws/images/stories/dd77ff9a833f_95C/rain8a4.jpg)
![rain9[4] rain9[4]](http://photoshoptutorials.ws/images/stories/dd77ff9a833f_95C/rain94.jpg)
![rain9a[4] rain9a[4]](http://photoshoptutorials.ws/images/stories/dd77ff9a833f_95C/rain9a4.jpg)
![rain9b[4] rain9b[4]](http://photoshoptutorials.ws/images/stories/dd77ff9a833f_95C/rain9b4.jpg)
![rain9c[4] rain9c[4]](http://photoshoptutorials.ws/images/stories/dd77ff9a833f_95C/rain9c4.jpg)
![rain10[9] rain10[9]](http://photoshoptutorials.ws/images/stories/dd77ff9a833f_95C/rain109.jpg)
![rain10a[9] rain10a[9]](http://photoshoptutorials.ws/images/stories/dd77ff9a833f_95C/rain10a9.jpg)

0 comentários:
Postar um comentário